Alexandre Neto
Saturday, May 11, 2024 | 6 minutes
Create a PyQGIS Development Environment Using Conda and VScode
As a self-taught PyQGIS developer, one of my main hurdles has always been to prepare the development environment for PyQGIS. An environment that allow me to run PyQGIS scripts, helps me code faster by providing PyQGIS highlighting and autocompletion, enables me to debug my plugins and scripts as they run, etc…
I have been a user (and even a… “cof cof”… maintainer) of the QGIS packages for conda provided by the conda-forge community. In Linux, it has allowed me to easily install the LTR version of QGIS (or any other version) alongside the most recent QGIS version provided by qgis.org apt repositories. I ended up finding that this was quite convenient for development too.
Regarding the editor, I have been hopping from one Python editor/IDE to another. I have used Eric4, Geany, PyCharm(JetBrains), Atom (GitHub), but now I use VSCode (Microsoft) or its “microsoft-less” alternative VSCodium. I must say that I really like using VSCode. It has lots of nice native features and a big collection of extensions that make it a very convenient text editor to work in many different coding languages and formats (I am using it right now to write this blog post in Markdown). It also has a nice integration with Conda environments and git, which ends up being a great help.
So, let me describe how I set up my PyQGIS Environment using these tools.
Note: I normally do my development in Linux, but, because most users are in Windows, I will try to mention any particularity of that operating system. I am sorry Mac OS folks, as always, you are on your own, as I have no way to virtualize Mac OS (blame Apple for that…), but I think it’s quite similar to Linux anyway.
Install conda
There are several installers that you can use to install conda in our systems, here are a few:
- Anaconda (by Anaconda inc)- A fully-fetched conda installation, already with many pre-installed Python packages, many of which you will probably never use.
- Miniconda (by Anaconda inc) - A lightweight installation of conda, containing only the necessary conda and python tools to install packages and manage environments (Recommended** choice for** beginners**)
- Miniforge (by conda-forge)- Same as Miniconda, but for convenience, use the conda-forge channel as default instead of the anaconda channel.
- Mambaforge - Similar to Miniforge, but contains alternative tools (
mambainstead ofconda) to build and install packages.mambacommands are similar but faster thanconda(my choice)
Choose whatever fits your needs better. During installation, you can use all the defaults.
Create a conda environment with QGIS
We will create a new conda environment, where we will install QGIS and any other packages that we may need. This environment will be isolated from the rest of your installs, so it won’t mess with your main installation of QGIS or Python.
I have already described QGIS installation in a bit more detail in another blog post Using QGIS using conda, but all you need is to run the following command in the console\terminal (Windows users: you need to use the Miniconda prompt), not the normal Command Prompt) to create an environment called qgis_dev with QGIS installed:
conda create -n qgis_dev qgis -c conda-forge
If you need a specific version of QGIS (I normally stick with the LTR version for development), use something like this:
conda create -n qgis_dev qgis=3.28.9 -c conda-forge
Likewise, if you also want to use a specific version of Python, the same:
conda create -n qgis_dev qgis=3.28.9 python=3.10 -c conda-forge
If you are using mamba, replace conda by mamba and you don’t need to specify
the conda-forge channel (Also, enjoy the extra speed in installation).
mamba create -n qgis_dev qgis=3.28.9 python=3.10
If you are on Windows, as a last step, make sure to close the Miniconda prompt before you continue.
Install and configure VSCode or Codium
As I said before, there are two alternatives here:
- Visual Studio Code - Microsoft product that has some telemetry and tracking options by default.
- VS Codium - a community-driven, freely-licensed binary distribution of Microsoft’s editor VS Code, which has the telemetry options off. This one’s installation is a bit trickier but not inhuman.
They work completely alike in usage. So… Your data, your choice.
Choose the correct installer according to your operating system, architecture and permissions (for Windows, there’s a user installer that doesn’t need administrator privileges) and execute it.
Use the default options during installation. In Windows, make sure to select the
option Add to PATH (requires shell restart). It will allow you to start VSCode
from the command line easily. On Linux, this comes by default.
Now, let’s open VSCode and install the Python extension.
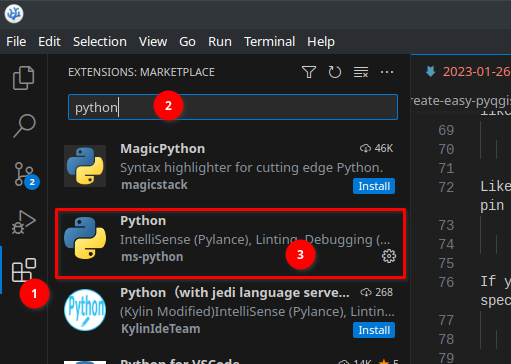
To install an extension in VSCode, check for the extension separator in the left
panel, click on it. Then search for the name of the extension. In our case,
search for python and then select the Python extension from ms-python
and click install. This will add IntelliSense (Pylance), Linting, Debugging
(multi-threaded, remote), Jupyter Notebooks, code formatting, refactoring,
unit tests, and more.
You can of course install other extensions, but for now, this is enough.
The last step, CLOSE VSCode.
How to use the environment
The steps above only need to be done once. The following steps are what you need to do whenever you want to use the prepared PyQGIS environment.
Note: If you have installed VSCode with the Miniconda prompt open, close it (it’s the requires shell restart part)
Open the Terminal (Linux and Mac) or the Miniconda prompt (Windows).
Activate que new environment
conda activate qgis_devOpen VS Code by typing
codein the terminal and pressing ENTER.In VSCode, go to File > Open Folder and select your working folder (the one you will use for development). Alternatively, you can navigate to the desired folder using the command line and open VSCode using
code .
You are all set. You can now start writing PyQGIS scripts or plugins and VS Code will know about QGIS packages and modules, it will highlight your code and offer auto-completion.
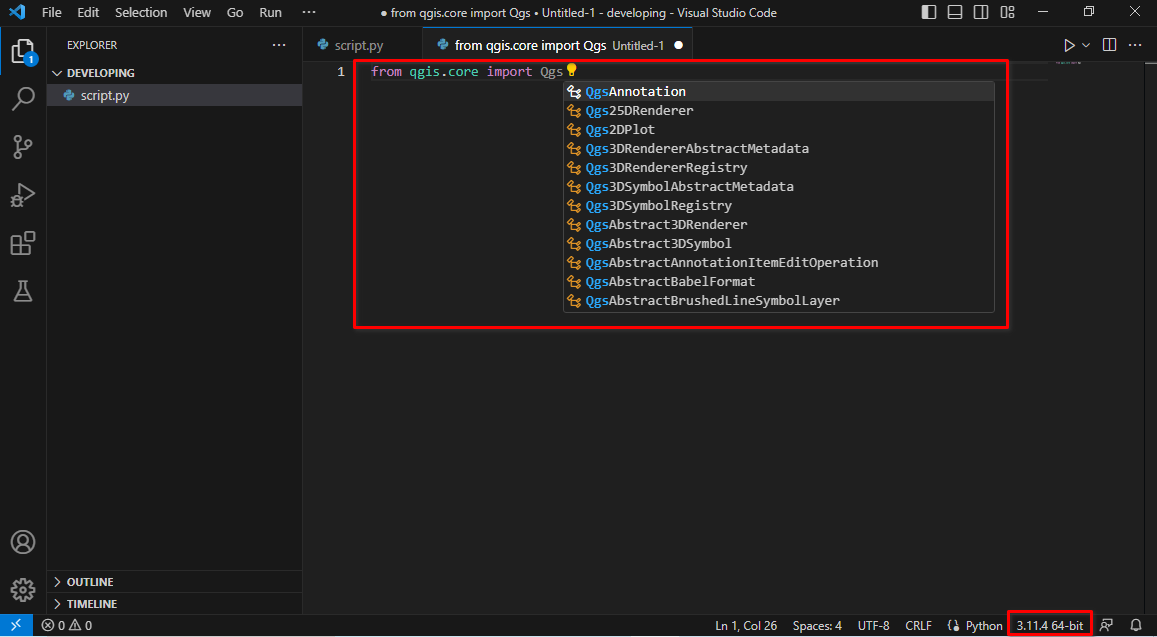
To test that everything is working as expected, you can create an empty Python file (File > New File > Python File), for example, test_pyqgis.py and start typing the following:
from qgis.core import Qgs
You should see the list of modules from qgis.core in a combobox after you type Qgs (it can take a while the first time). Besides, on the right corner of the screen, you should see something like 3.11.4 64bit. If you over it, it should show the location of your qgis_dev conda environment. This means that VSCode is using the qgis_dev python environment and not any other.